Most quoting delays on a wire harness are not caused by capacity or price. They are caused by a wire harness drawing that can be read two ways — a branch length without a datum, a tolerance that covers the harness in one state and not the state it is installed in, a connector without a cavity map. The supplier quotes, the assumptions surface during first article, and the wire harness drawing goes back out for revision.
This is the checklist we use when reviewing an OEM harness drawing. It is short enough to run through in ten minutes and it catches the items that account for most of the rework we see.
Make the circuit unambiguous
Show connector and terminal part numbers, cavity positions, wire gauge, color and circuit identification. Reference the mating condition where orientation could be misread.
A connector without a cavity map is an invitation to guess. Number the cavities as seen from the mating face, state which view the drawing is showing, and give the terminal part numbers rather than only the housing. If two adjacent circuits could be swapped without anyone noticing at assembly, say so explicitly on the wire harness drawing — that note is what stops a mirrored harness reaching your line.
Connector and terminal manufacturer part numbers, both ends and every branch.
Cavity numbering with the viewing direction stated.
Wire gauge and color per circuit, plus the circuit ID printed on the wire.
Mating condition or a reference photo where orientation could be misread.
Control geometry
Define branch lengths, datum points, tolerances, breakout positions and critical routing. Note whether dimensions are measured pulled straight or in a fixture.
Length is the single most argued dimension on a harness drawing, because a harness is flexible and the number depends on how it is held. State the datum for every branch, and state whether the dimension applies to the harness laid straight on a table or installed in its fixture — the two can differ by several millimeters on a long run, and both are legitimate as long as only one of them is on the wire harness drawing.
Overall length and the datum each branch is measured from.
Breakout positions and the length of the free tail at each one.
Tolerance per dimension — not one blanket note for the whole drawing.
Whether dimensions are measured straight or in the installation fixture.
Critical routing or clip positions that must survive assembly.
Specify protection and identification
Call out sleeve, tape, conduit, heat-shrink, labels and any restricted zones. Include label content and orientation when it matters at installation.
Protection is usually specified as a material and left at that. The detail that gets missed is extent and position: where the braid starts and stops, how far the heat-shrink covers the breakout, whether the label faces the technician or the panel. Those are the things an assembler has to decide on the floor if the wire harness drawing does not say.
Sleeve, tape, conduit or braid — material, plus start and end points.
Heat-shrink at breakouts: coverage length and whether it is adhesive-lined.
Label content, size, position and readable orientation after installation.
Restricted zones: no labels, no splices, no excess bulk in a given area.
List inspection and test needs
State continuity, pinout, pull, dimensional or visual requirements, plus the documents expected with delivery.
Name the test and the acceptance criterion separately. “Test continuity” leaves the resistance threshold to the supplier; “continuity, 100% of units, maximum 2 Ω per circuit including the contact” does not. The same applies to pull force, where the criterion is a minimum value measured on a defined sample size at defined intervals.
Continuity and pinout: 100% of units or a sampling plan, and the resistance limit.
Insulation resistance or hipot: voltage, dwell time, and pass threshold.
Crimp pull force: minimum value and sampling frequency.
Dimensional checkpoints and visual acceptance criteria.
Documents with delivery: first article report, material certs, cert of conformance.
Drawing self-check
Twelve items that decide whether a drawing gets quoted straight or comes back with questions. Tick what is already on yours – the list tells you what is still open.
0 of 12 on the drawing Tick the items your drawing already covers.
Missing items do not block a quote. They decide whether the first answer is a price or a list of assumptions we had to make.
Tolerances: where drawings usually go wrong
Four patterns account for most of the wire harness drawing revisions we ask for:
No datum. A branch length with nothing to measure from.
One tolerance for everything. A ±1 mm note on a dimension that needs ±0.2 mm, and a ±0.2 mm note on a length that only needs ±10 mm. Both cost money — the first in scrap, the second in process control that buys nothing.
Tolerance in the wrong state. Dimensions that hold on the bench and not in the fixture.
Tolerance stack on a breakout. Each branch within spec, the assembled harness not fitting the cover.
We build and inspect to IPC/WHMA-A-620 Class 3 workmanship criteria unless the drawing specifies otherwise, under an ISO 9001 quality management system. That covers workmanship — it does not replace the dimensional tolerances only you can define.
Drawing FAQ
Do you accept a sample instead of a drawing?
Yes. We measure the interface, map the pinout and produce a drawing for you to approve before anything is built — see sample reverse engineering. Many OEM programs start that way, particularly when the original documentation is gone.
Which file formats do you work from?
PDF drawings and DXF or STEP for geometry. For the circuit, a netlist in Excel or a simple pin-to-pin table is fine — it does not need to be a native harness CAD file.
What comes back with the first article?
The parts, plus a first article report to your format or ours: dimensional results, continuity and pinout verification, and pull force values. See prototyping and first article.
What is the MOQ and lead time?
500 pcs per part number for production runs, and 1 to 50 pcs for prototypes and samples. Prototypes ship in 3 working days, production in 14 working days after sample approval.
Next step: send the wire harness drawing or one sample and we will come back with the questions that would otherwise turn into assumptions — usually within one working day. Start a build-to-print review or request a production review.
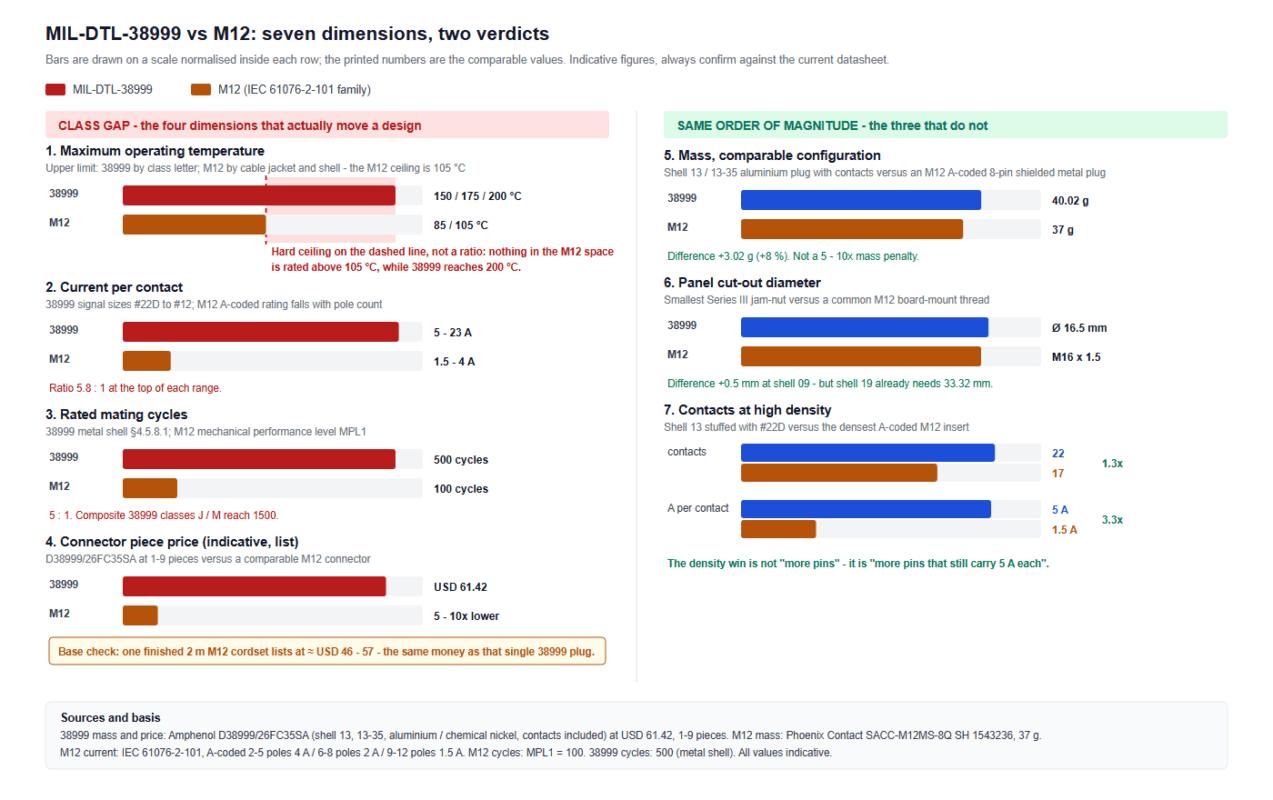
MIL-DTL-38999 vs M12 compared across seven dimensions: only four are separated by a class. Current ratings, temperature, mating cycles, mass and the base trap in price comparisons.
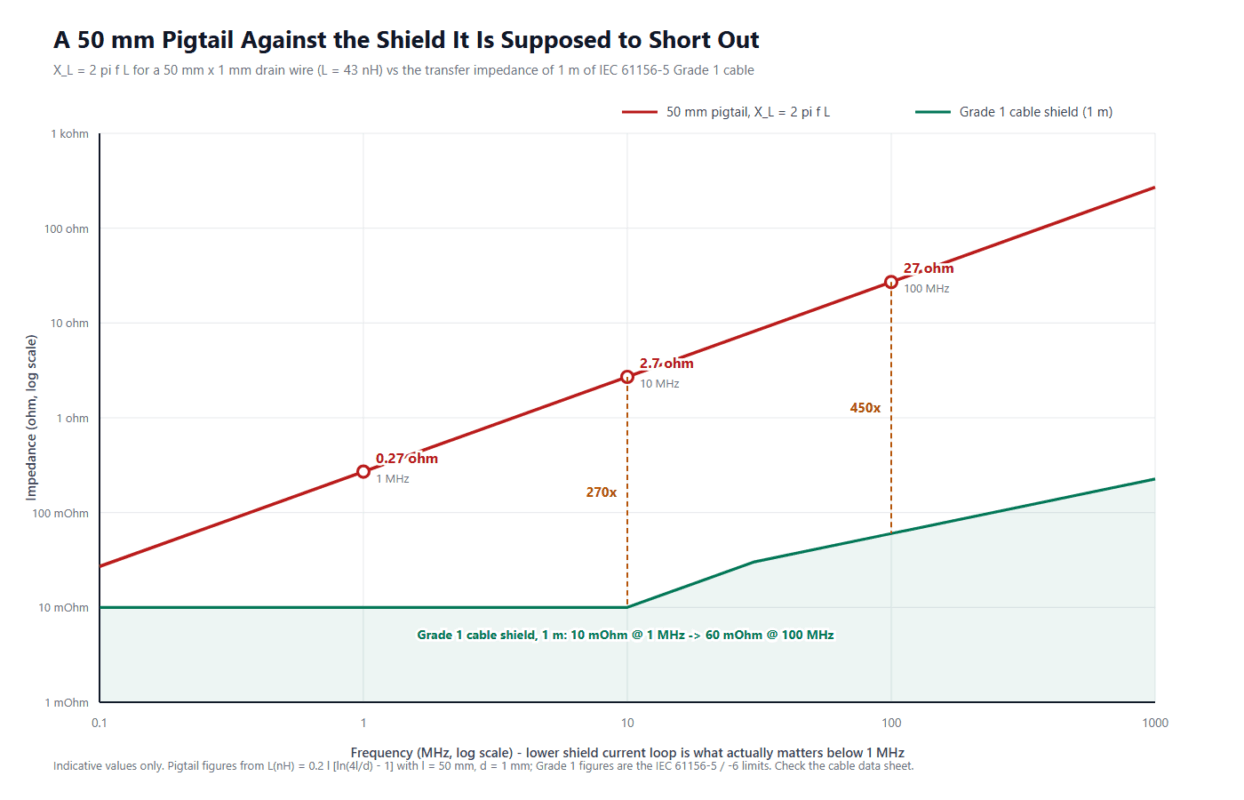
Shielded vs unshielded cable: a 50 mm pigtail adds 43 nH and 27 ohms at 100 MHz, while a Grade 1 cable shield is under 60 milliohms per metre. NASA measured 30 dB.
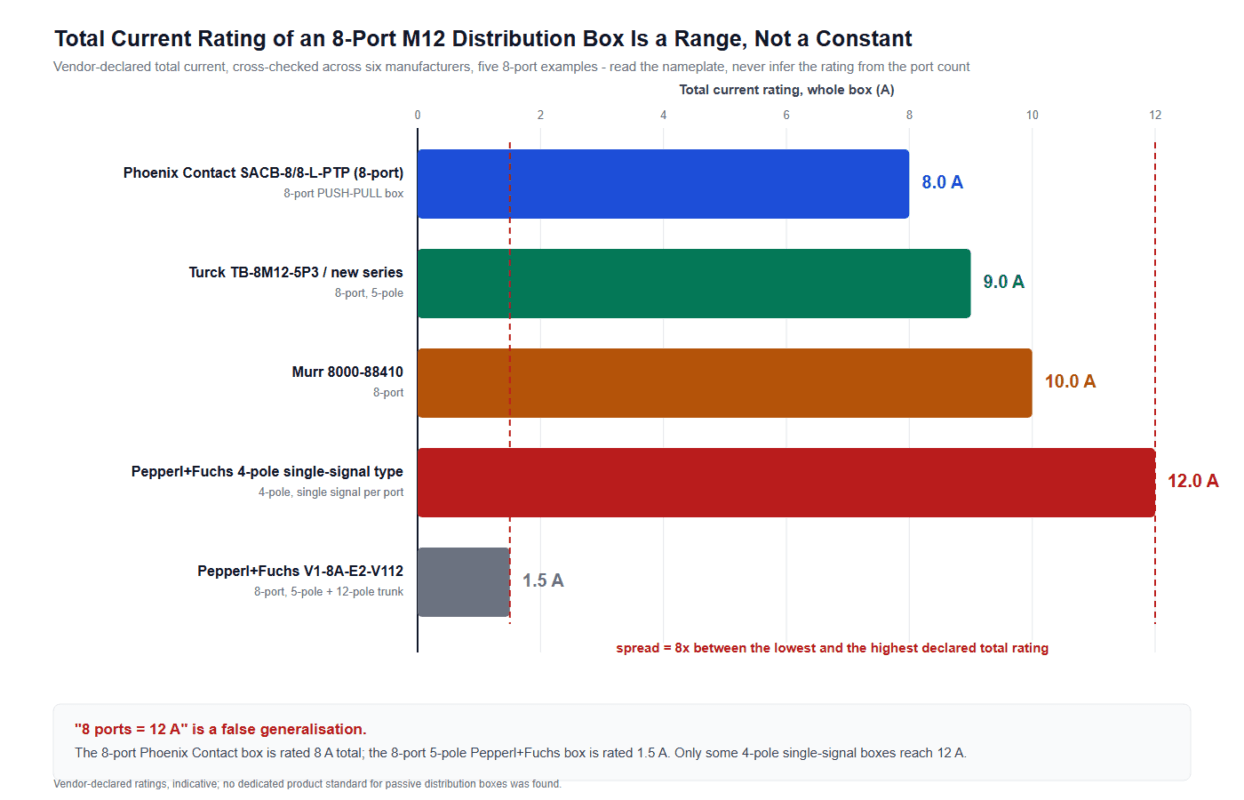
M12 distribution box selection: total ratings range from 8 A to 12 A across six vendors, and a 10 m trunk on 0.75 mm2 drops 4.16 V at 8 A, below the 20.4 V floor.