Battery Cable Installation Kit with Terminal Clamps and Lugs
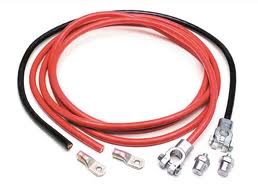
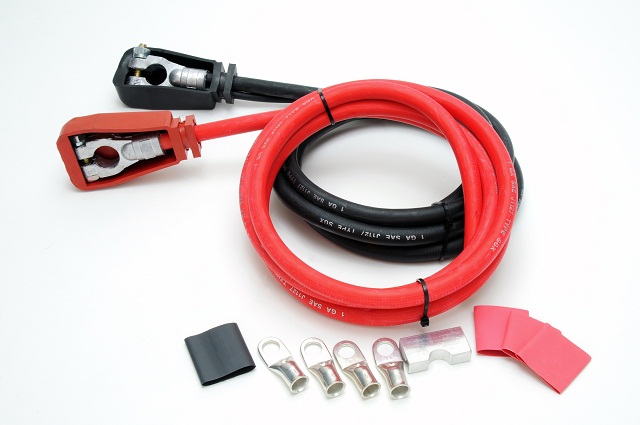
An installation kit clamps lugs set for a battery cable run: pre-cut red and black leads, insulated positive and negative terminal clamps, ring lugs and heat shrink boots. Suits hot rod, classic and custom vehicle builds.
Overview
An installation kit clamps lugs set is what you fit when the original battery cabling is gone, undersized, or was never right in the first place. This is the kit for hot rod, classic and custom vehicle builds: pre-cut red and black leads, insulated positive and negative terminal clamps, ring lugs and heat shrink boots, sized so the whole run gets done in one job instead of three trips to the parts shop. The engineering question is not which kit, it is what cross section and what clamp form, and both answers come from the current and the run length rather than from the battery post.
Key Specifications
| Cable Type | Battery Cable Installation Kit |
|---|---|
| Contents | Power leads, terminal clamps, ring lugs, heat shrink |
| Application | Hot Rod / Classic / Custom Vehicle |
| Lead colors | Red and black, positive and negative |
| Terminations | Ring lugs crimped and sealed with heat shrink |
| Cross section | Stated per your drawing |
| Length | Stated per your drawing |
| Testing | 100% continuity check before packing |
What goes in the kit, and what each part is for
| Part | What it does | What to check before you buy |
|---|---|---|
| Positive lead, red jacket | Carries the feed from the battery to the starter solenoid or the distribution point | Cross section and length, decided by current and run |
| Negative lead, black jacket | Returns current to the battery or to the chassis earth point | Same cross section as the positive run |
| Insulated terminal clamps | Grip the battery posts and carry the full current into the lead | Post form and diameter: top post, side post, JIS pencil or L-terminal |
| Ring lugs | Bolted terminations at the solenoid, the chassis and the distribution point | Stud diameter and the crimp barrel for your cross section |
| Heat shrink boots | Seal the crimp barrel and the conductor entry against moisture | Adhesive-lined in a wet or under-hood location |
Size the lead before you size the clamp
Voltage drop is the thing that gets ignored and then blamed on the starter, or on the car battery that tests perfectly well. The arithmetic is simple and worth doing once: drop equals current times the resistance of the round trip, and the round trip is twice the one-way length. The figures below are the industry-standard maximum conductor resistances for flexible copper at 20 C, and the drop column is worked for a 4 m one-way run at 200 A, which is roughly a trunk-mounted battery feeding a starter.
| Cross section | Resistance per meter at 20 C | Round trip over 4 m | Drop at 200 A |
|---|---|---|---|
| 16 mm2 | 1.21 mOhm | 9.7 mOhm | 1.94 V |
| 25 mm2 | 0.78 mOhm | 6.2 mOhm | 1.25 V |
| 35 mm2 | 0.55 mOhm | 4.4 mOhm | 0.89 V |
| 50 mm2 | 0.39 mOhm | 3.1 mOhm | 0.62 V |
Service literature often quotes a half volt as the acceptable drop across a cranking circuit, and on that basis a 4 m run at 200 A needs 50 mm2 rather than the 25 mm2 most people reach for. That is the whole point of doing the arithmetic: the clamp that fits is not the constraint, the cross section is. The sizes your kit is built to are the ones on your order.
Clamp forms, and how to read your battery posts
| Post form | Where you see it | What goes wrong | What to specify |
|---|---|---|---|
| Tapered top post | Most North American and many European cars | A clamp that has been spread and re-tightened stops gripping | Lead clamp sized to the post, not a universal fit |
| Side post, threaded | A large share of GM vehicles | Stripped threads in the battery case | Correct thread and a bolt length that does not bottom out |
| JIS pencil post | Japanese domestic market and imports | A standard clamp simply will not fit | JIS clamp form |
| L-terminal, DIN | European vehicles | Partial contact area and a hot joint | The L form and the correct taper |
| Marine wing nut | Boats and dual-purpose batteries | Loosening under vibration | Stainless hardware and a lock washer |
Crimp, then seal: why not solder
Soldering a battery lug looks tidier and works worse. Solder wicks up the strand bundle and creates a stiff section right where the cable needs to flex, and that is exactly where these leads break. A proper hex or indent crimp cold-welds the conductor into the barrel, and an adhesive-lined heat shrink boot over the top keeps moisture out of the interface. Add a little dielectric grease on the post, and check the joint is not the warmest thing under the hood after a long crank.
Symptom to cause, for the leads that come back
| What you see | Most likely cause | What fixes it |
|---|---|---|
| Slow crank, battery tests fine | Undersized conductor for the run length | Re-size using the drop calculation, not the clamp size |
| Clicking, then nothing | High resistance at the post or at the crimp | Clean to bright metal, re-crimp, re-torque |
| Lead hot after a crank | Undersized conductor or a poor crimp | Same two checks: cross section and termination quality |
| Green or white powder at the terminal | Acid fumes and moisture reaching the joint | Tinned conductor, sealed boot, dielectric grease |
| Intermittent electrical faults | Loose clamp or a broken strand inside the insulation | Check the grip on the post and flex-test the lead |
Construction
- Stranded copper leads, highly flexible so the run can be routed without fighting it.
- Tinned conductor where the kit will see moisture, salt or an engine bay.
- Ring lugs crimped on the correct die for the cross section, then sealed with heat shrink.
- Insulated clamps in red and black so polarity is obvious in a dim engine bay.
- Cross section and length per your drawing, matched across the positive and negative runs.
Typical applications for this installation kit clamps lugs
- Hot rod and classic builds where the battery has moved to the trunk
- Custom vehicle wiring where the original harness no longer matches the build, alongside a heavy-duty ring terminal battery lead
- Restoration work where the old leads are corroded end to end, with insulated terminal clamps for the jump points
- Dual battery setups on 4x4s and campers, paired with a battery harness for the auxiliary circuits
- Workshop and yard vehicles that get jumped regularly, next to a vehicle radio power cable for the accessories
Workmanship and testing
For Battery Cable Installation builds the line runs to IPC/WHMA-A-620 Class 3 under ISO 9001, terminating 32 to 12 AWG. Each Battery unit passes a 100% continuity and pinout check before it ships, and seal checking is quoted whenever an ingress rating is on the drawing.
Every production run can ship with RoHS and REACH declarations and the electrical report agreed at quotation; see certifications and material declarations. UL styles and other named approvals are built to drawing: we source to the style you specify and document it, rather than asserting a listing we do not hold. This assembly is built on the four lines covered under the assembly lines behind this build, with nothing in the build handed to an undisclosed subcontractor. The wider context is covered under cable assemblies for automotive and EV. Tooling is quoted separately, cut in-house rather than brokered out, and owned by you.
Custom builds and ordering
Battery Cable Installation prototype lots start from 1 to 50 pcs and ship in 3 working days. Production requires 500 pcs and runs 14 working days after approval. Tooling not already held adds around 10 working days. Private-label Battery runs ship under your part number and labeling, and material certificates and first-article reports can be supplied.
Related battery and power leads
- Battery Jumper Lead with Insulated Terminal Clamps
- Heavy-Duty Ring Terminal Battery Lead Cable
- E-Bike Battery Harness with Discharge and Charge Leads
- Kenwood Vehicle Radio Power Cable, PG2N / PG3N / PG4N
- Type2 to NACS Adapter for Single-Phase AC Charging
Full range: automotive cable and wire harness.
Frequently Asked Questions
What cross section do I need?
Work it out from the current and the round trip: drop equals current times resistance, with the resistance taken over twice the one-way length. If you would rather not, tell us the current, the length and the system voltage and we will size it with you.
Which clamp form fits my battery?
Look at the post. Tapered top post, threaded side post, JIS pencil and the European L-terminal are four different forms, and a universal clamp fits none of them properly.
Should the crimp be soldered as well?
No. Solder wicks up the strands and makes a stiff section that breaks where the lead flexes. Crimp on the correct die and seal with adhesive-lined heat shrink.
Can I get the kit in a different length or with different lugs?
Yes. Cross section, length, lug stud size and clamp form are all specified on the order rather than fixed by a catalog part number.
| Cable Type | Battery Cable Installation Kit |
|---|---|
| Contents | Power leads, terminal clamps, ring lugs, heat shrink |
| Application | Hot Rod / Classic / Custom Vehicle |
| Lead colors | Red and black, positive and negative |
| Terminations | Ring lugs crimped and sealed with heat shrink |
| Cross section | Stated per your drawing |
| Length | Stated per your drawing |
| Testing | 100% continuity check before packing |